Adding properties
Add a home or rental with a guided setup (AI-assisted).
Overview
Adding a property is the first step to keeping everything organized by location. Once your property is created, schedules, reminders, files, notes, spaces, and belongings can stay connected—so you can find what you need and track what changes over time.
Nothing is final until you review and create the property. You can edit everything later.
Overview of the 5-step wizard
- Address – Locate and confirm the property's location
- Details – Review and customize basic property information
- Spaces – Identify and configure rooms and areas of the home
- Media – Upload property photos for documentation and AI insights
- Review – Confirm everything before creating the property
Using desktop or mobile
You can add a property from either a desktop browser or a mobile device. The full Add Property wizard adapts to any screen size, allowing you to enter details comfortably at a desk or walk around your home with your phone.
When uploading photos during Step 4, you can:
- Upload images from your computer
- Use your mobile device camera to take photos in real time
- Choose images from your device's gallery
This flexibility makes it easy to capture accurate, up-to-date photos for documentation and AI analysis.
AI-powered photo analysis
When you add photos of your property, iMaintain uses advanced AI vision to interpret what it sees. This allows the system to:
- Identify visible features, materials, and exterior components
- Improve the accuracy of your initial property setup
- Enhance maintenance recommendations and long-term insights
- Provide more personalized support through the iMaintain Copilot
These AI-generated insights continue to enhance your property profile over time as you add more photos.
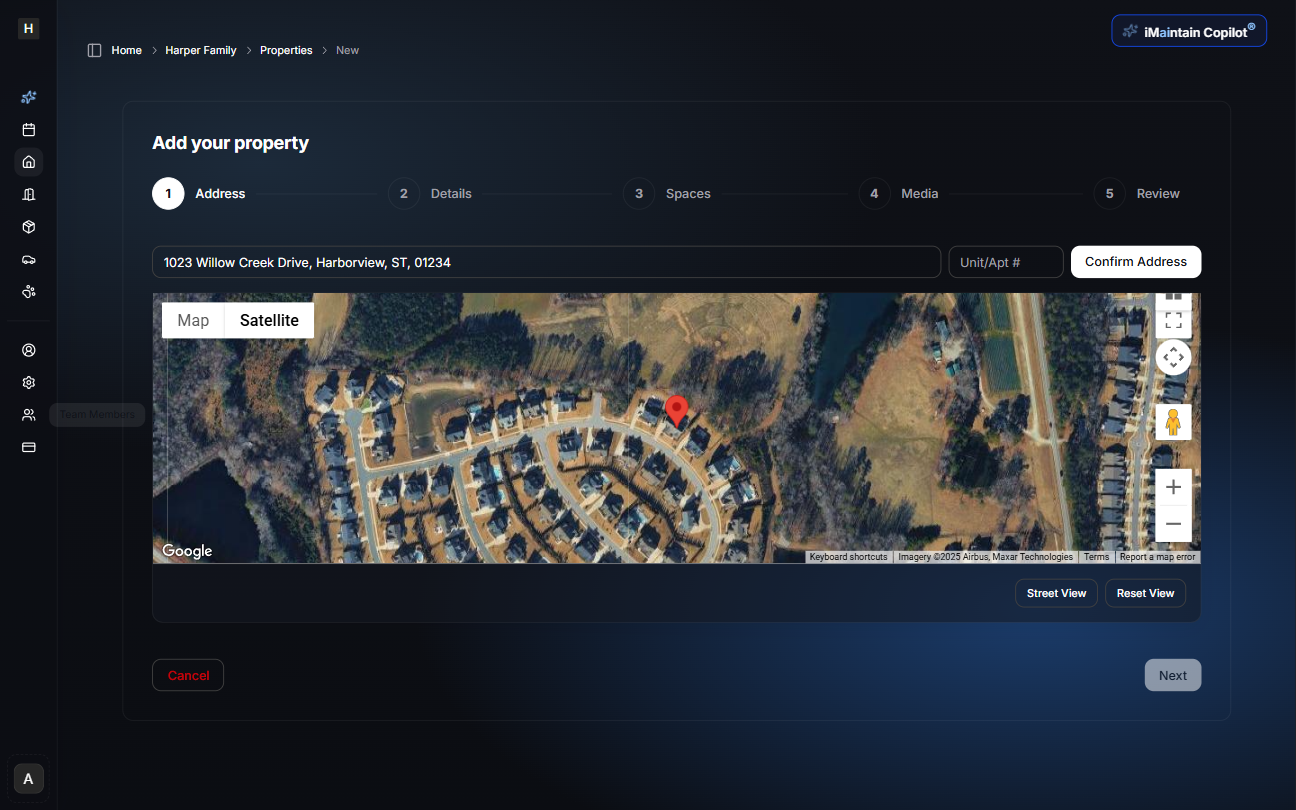
Step 1 — Address
Begin by entering the property's street address or searching for it directly.
After entering the address:
- A map preview appears using Google Maps
- You can toggle between Map and Satellite views
- Drag the pin if needed to improve accuracy
- Add an optional Unit/Apt number
- Select Confirm Address to lock in the location
Once confirmed, click Next to proceed.
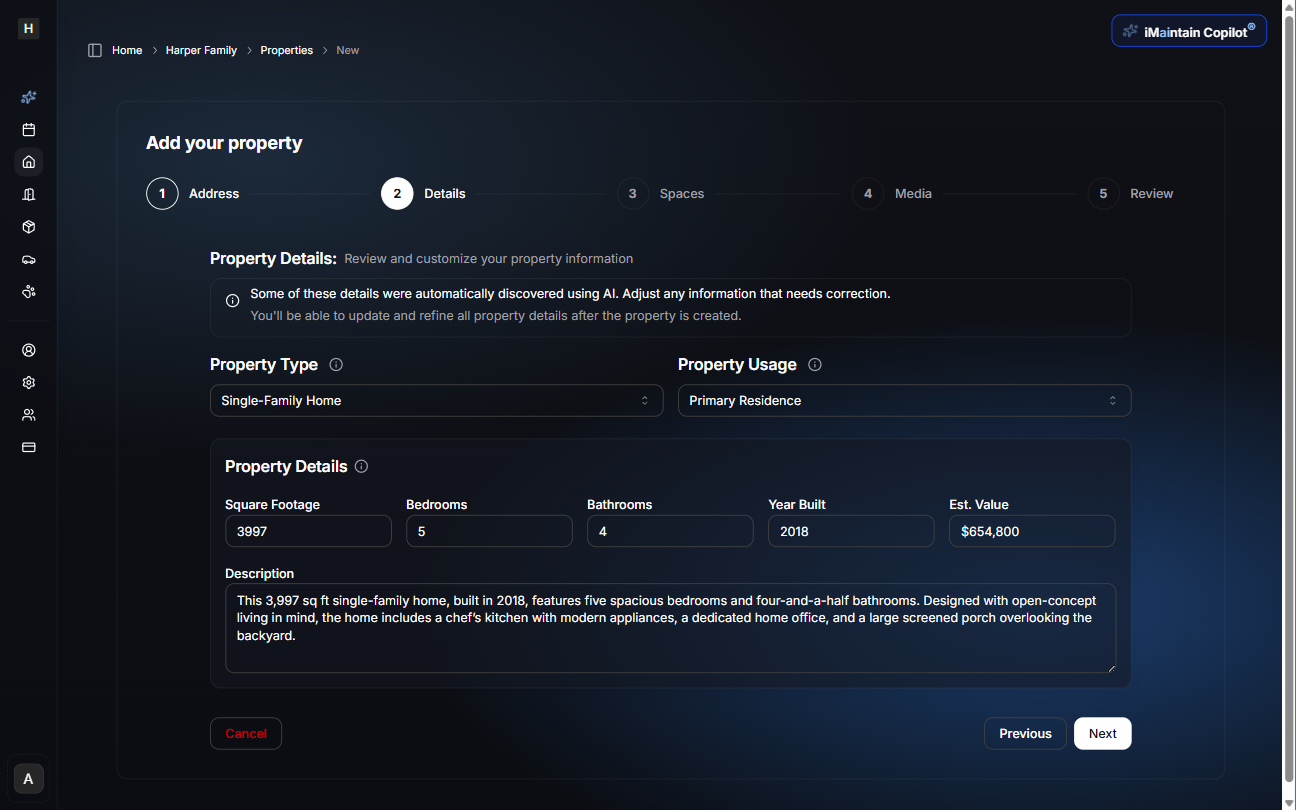
Step 2 — Details
iMaintain automatically gathers publicly available information and AI-assisted insights related to your property. You may adjust any details before moving on.
Property type & usage
- Choose the property type (e.g., Single-Family Home, Townhome, Condo)
- Select how the property is used (Primary Residence, Secondary Home, Rental, etc.)
If you choose a rental-oriented usage type, such as Short-term rental or Long-term rental, iMaintain adds a Rental section to the property after it is created. Use that section to track rental periods, deposits, files, tasks, revenue, and maintenance costs.
Editable property details
- Total square footage
- Number of bedrooms
- Number of bathrooms
- Year built
- Estimated value
- Description (auto-generated but fully customizable)
Review everything to ensure accuracy, then click Next.
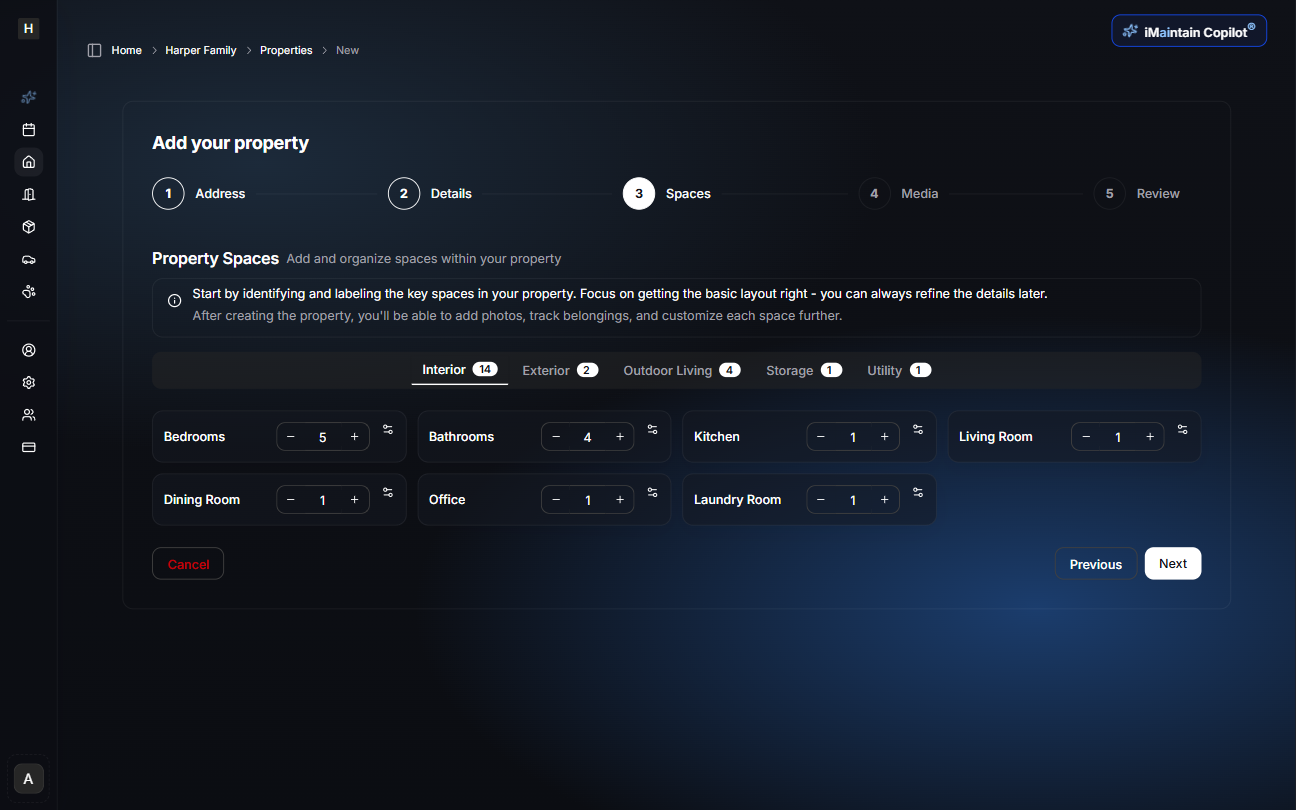
Step 3 — Spaces
This step defines the structure of your property so iMaintain can intelligently organize information and generate accurate maintenance suggestions.
Space categories include:
- Interior
- Exterior
- Outdoor Living
- Storage
- Utility
For each space type, you can:
- Increase or decrease quantities
- Click a space to configure it further
Customizing individual spaces
Selecting a space (e.g., Bedrooms) opens a detailed modal where you can specify:
- Room name (e.g., "Primary Bedroom (Mom & Dad)")
- Floor level
- Square footage
- Room notes and features (e.g., ensuite bathroom, walk-in closet)
These details help personalize your property layout and improve AI-driven insights.
Click Next when your spaces are set up.

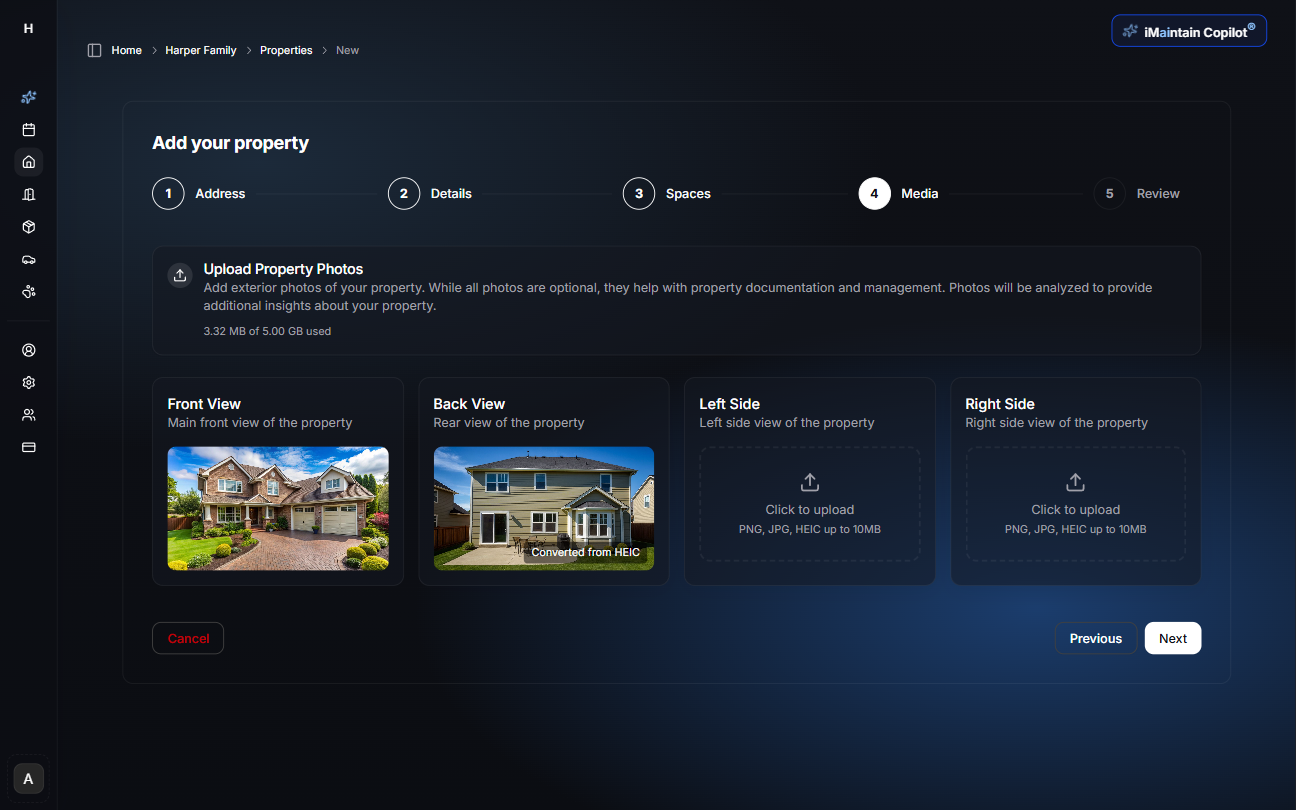
Step 4 — Media
Add exterior property photos to help document your home and support AI-driven analysis.
You may upload photos such as:
- Front view (main exterior)
- Back view
- Left side
- Right side
Supported formats include PNG, JPG, and HEIC (up to 10 MB per image). Your storage usage is displayed based on your current plan.
AI photo insights
iMaintain will analyze your photos using AI vision to identify exterior features and materials. These insights:
- Strengthen your property setup
- Provide additional context for future tasks
- Enable the iMaintain Copilot to deliver smarter, more personalized guidance
Once you've added your photos, select Next.
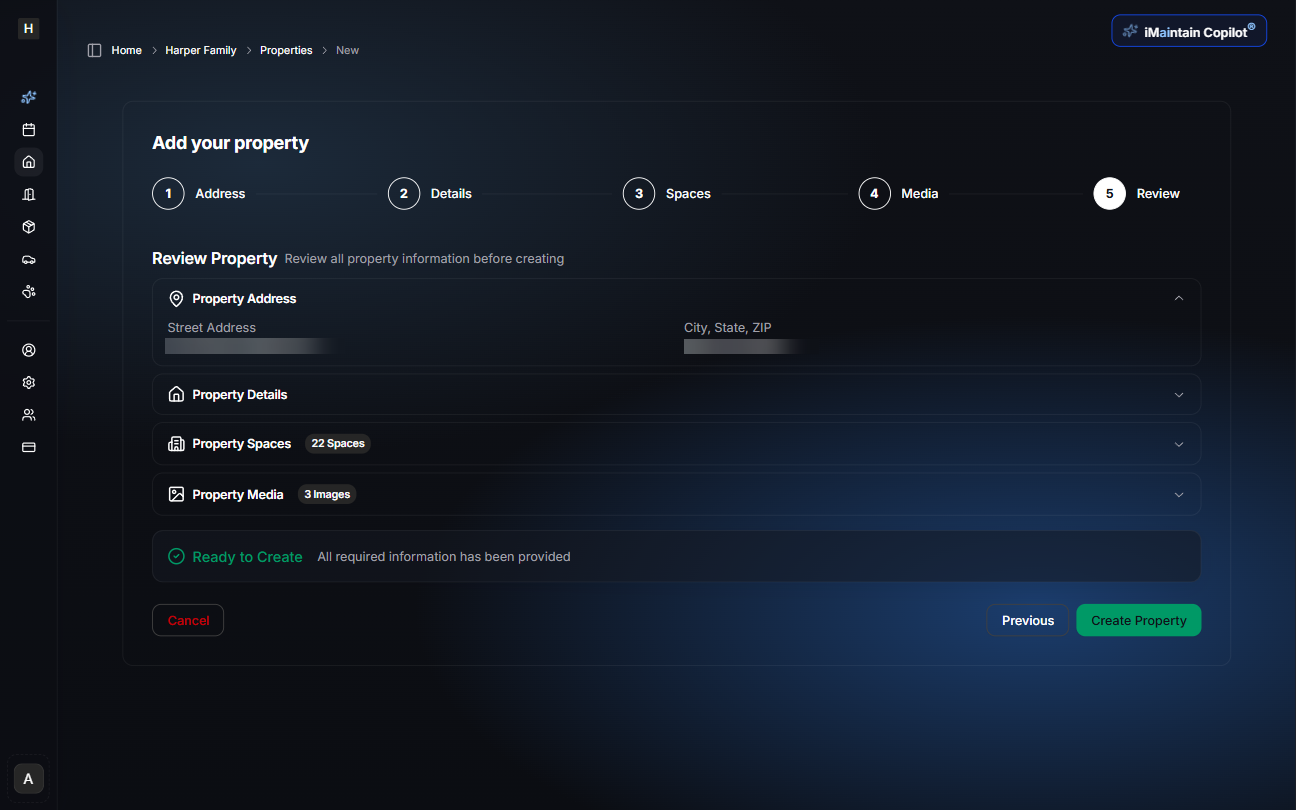
Step 5 — Review
The final step gives you a complete overview of everything you entered.
Sections include:
- Property Address
- Property Details
- Property Spaces (with counts for each category)
- Property Media (number of uploaded images)
A status indicator confirms when the property is Ready to Create.
If all the information looks correct, click Create Property to finalize the setup.
Your property is ready
Once created, you can:
- Add belongings, appliances, and systems
- Upload documents and receipts
- Set up one-time or recurring maintenance schedules
- Receive AI-powered insights from the iMaintain Copilot
- Track tasks, photos, and documents across each space
Your new property is now fully prepared for proactive care and intelligent maintenance management.
Related
- Property maintenance - Set up and track maintenance tasks
- Property files - Upload documents and receipts
- Spaces Documentation - Learn more about organizing rooms and areas
- Copilot for properties - Get AI-powered insights for your properties