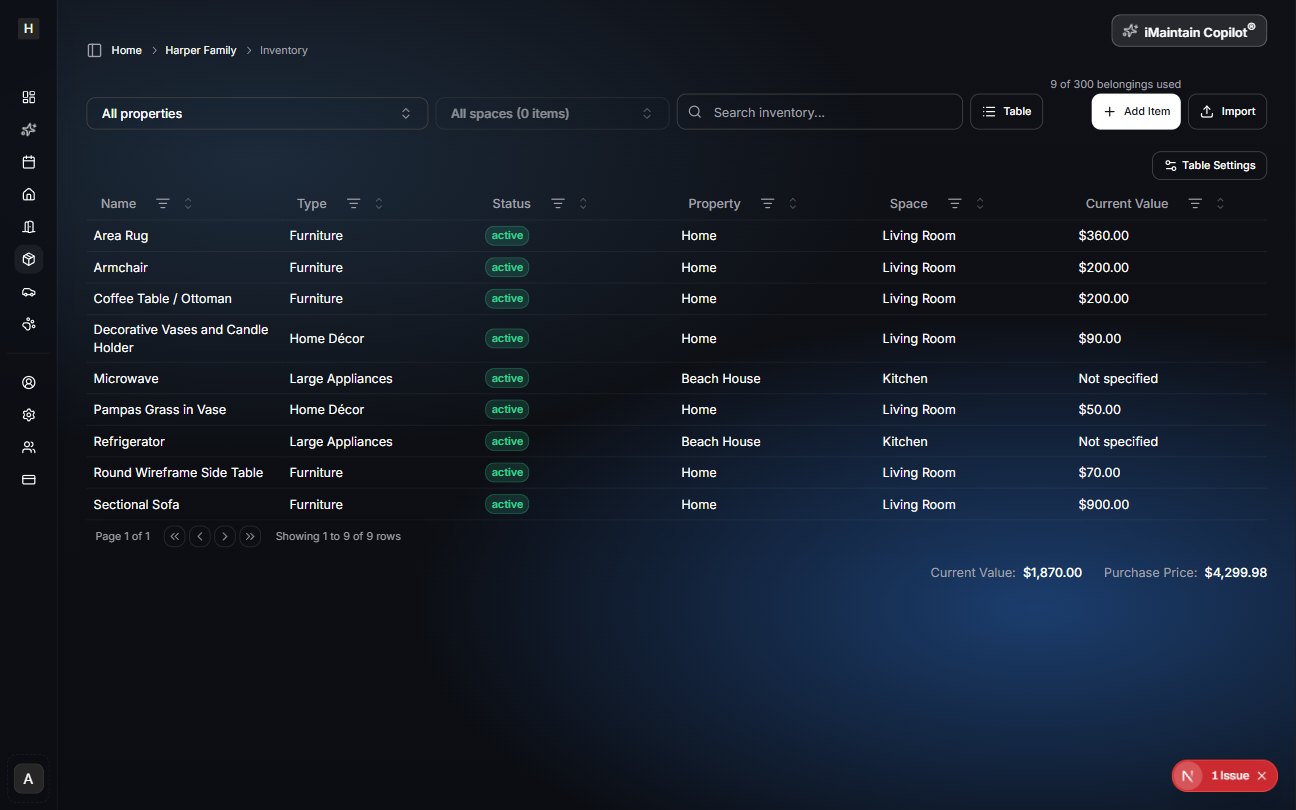
Import inventory items
Upload a file, review detected items, and import them into your Inventory.
Overview
This guide walks through importing belongings (inventory items) from a CSV/TSV/TXT file into iMaintain.
You’ll upload a file, run analysis, review each detected row, and then import only the items you choose.
Before you start
- You’ll need at least one Property in iMaintain.
- Each item must have a Category (you can pick one during review).
- Plan limits may apply (for example, how many properties or items you can add). If you’re at your plan limit, the “Add property” / “Add space” actions may be disabled.
Key concepts (Property, Space, Category)
- Property: A home, rental, or place you manage in iMaintain (for example: “Home”, “Beach House”).
- Space: A room or area inside a property (for example: “Kitchen”, “Garage”, “Bedroom 2”). A property can have many spaces.
- Category: How iMaintain classifies an item (for example: Appliance, Furniture, Electronics). Category helps organize and filter your inventory.
- Inventory item (belonging): The thing you’re importing (for example: “Refrigerator”, “Desk”). Items belong to a Property and can optionally be assigned to a Space.
Supported file formats
.csv(comma-separated).tsv(tab-separated).txt(tab- or comma-delimited)
File tips
- Include a header row (column names) on the first line.
- Use UTF‑8 text encoding if possible.
- For best results, include columns like
Name,Type,Property, and optionalSpace.
Sample files
Use these sample files to test the import flow:
- CSV: inventory-sample.csv
- TSV: inventory-sample.tsv
- TXT (comma-separated): inventory-sample.csv.txt
Step 1 — Upload
- Open Inventory.
- Click Import items.
- Upload your file.
- Click Analyze.
What happens during analysis:
- We detect rows that look like items
- We try to map columns (like Name, Type, Property, Space)
- We generate a preview so you can review before importing


Resume later
If you close the import dialog, you can pick up where you left off. Open Import again and use Resume previous import to continue reviewing the same file. Items you already imported will be marked as imported and can’t be imported twice.
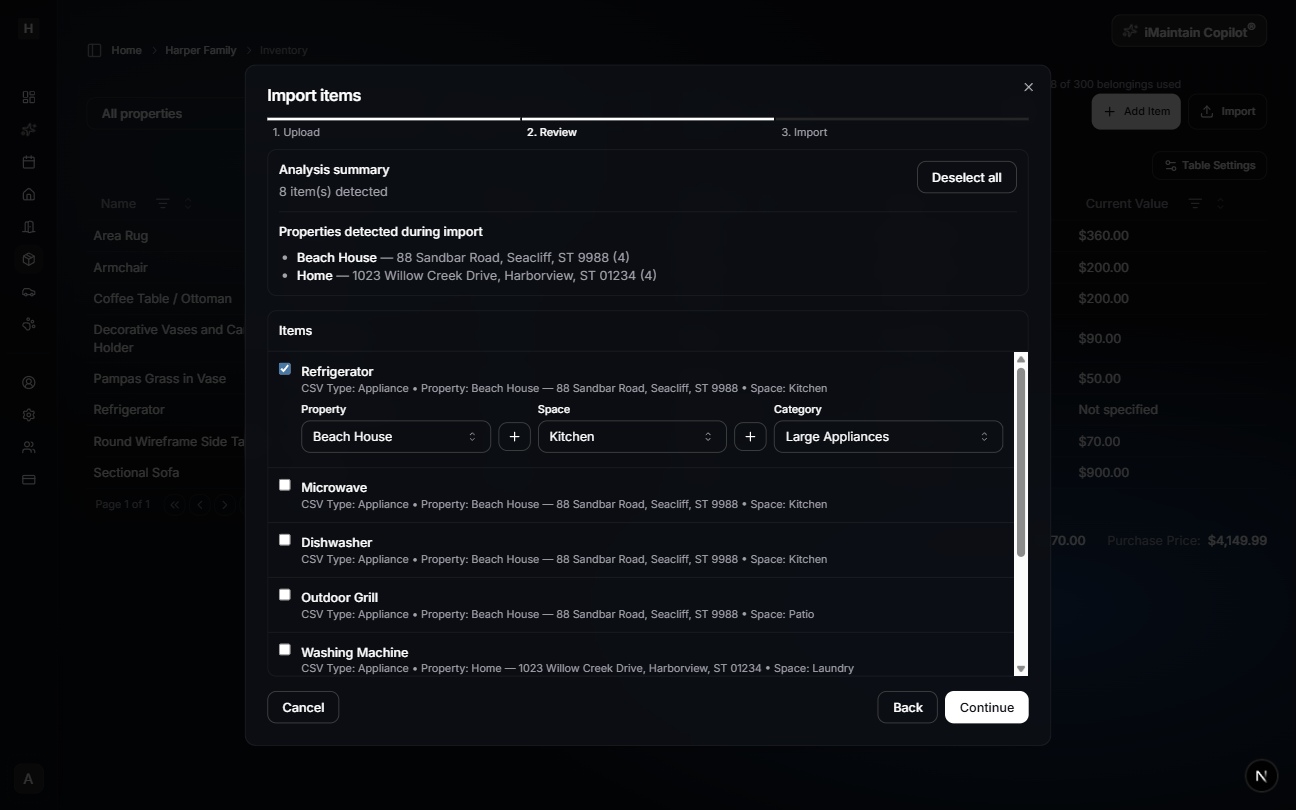
Step 2 — Review
After analysis, you’ll see a list of detected items.
Select what to import
- Use Select all / Deselect all to quickly manage selections.
- If your plan has an item limit, selection may be capped.
Tip: Import in batches
You don’t have to import everything at once. Select a few items, import them, and come back later to finish the rest.
Assign required fields
For each selected item:
- Property: where the item belongs
- Space (optional): room or area within the property
- Category: required (used for organizing and filtering)
You can also create missing Properties/Spaces during review (when your plan allows it), then return to the import flow.
Already imported rows (resuming)
If you resume a previous import, rows that were already imported are shown as imported and can’t be imported again.
What gets imported (and what doesn’t)
- Imported: the selected inventory items (belongings) you confirm in Step 3.
- Not imported automatically: properties and spaces from your file. You can create them during review when needed.
- No duplicates: when resuming an import, already imported rows are locked so they can’t be imported twice.
Step 3 — Import
- Confirm your selection count.
- Click Import.
We’ll create the selected items and return you to Inventory.


Troubleshooting
“No headers or sample rows provided”
Your file likely doesn’t have a proper header row. Ensure the first row contains column names like Name, Type, Property, Space.
Category is missing
Some files don’t include a category column. In Review, choose a Category for each selected item.
Can’t find the right Property/Space
Create it directly from the Review step (if available) and return to continue importing.
What’s next
Imported items appear in Inventory, where you can add photos and files (receipts, manuals), write notes, and create maintenance tasks and schedules to care for your belongings over time.
You can also use the iMaintain Copilot to ask questions and get insights—because your items now have real context (property, space, category, and supporting files).